Mostrando entradas con la etiqueta Modelismo. Mostrar todas las entradas

miércoles, 8 de febrero de 2023

W40K - Dreadnoughts contemptor de los Mil Hijos

Buenas a tod@s,

Hoy os traigo unos Dreadnought Contemptor de los Mil Hijos. Un gran amigo me imprimió en 3D estas dos miniaturas a cambio de que le fabricara unos marcadores transparentes (podéis ver el tutorial en este enlace si os queréis hacer unos vosotros mismos).

Hi all!

Today I bring you some Dreadnought Contemptor of the Thousand Sons. A great friend 3D printed these two miniatures for me in exchange for him making him some transparent markers (you can see the tutorial at this link if you want to make your own).


Para estos bípedos de Warhammer 40.000 utilicé aerógrafo y varias otras técnicas que he ido aprendiendo como los daños de batalla con esponja.

Os voy a intentar dejar un breve resumen del proceso y después las fotos, si tenéis cualquier duda no dudéis en comentar, aunque sea para criticar lo mal que pinto XD.

For these Warhammer 40,000 bipeds I used airbrushing and various other techniques I've been learning like sponge battle damage.

I'm going to try to give you a brief summary of the process and then the photos, if you have any questions, don't hesitate to comment, even if it's to criticize how badly I paint XD.

1. Pre sombreado con aerógrafo (imprimación negra y blanco para volumen).

1. Pre-shaded with an airbrush (black primer and white for volume).


2. Capa base fina con aerógrafo de verde gris medio de Vallejo (el código de la pintura es70.973).

2. Vallejo Medium Gray Green Airbrush Thin Basecoat (Paint Code is 70.973).

3. Capa fina con aerógrafo de Nihilakh Oxide de Games Workshop (según lo saturado que queráis el acabado dar una o dos capas, siempre finas).

3. Thin coat with an airbrush of Nihilakh Oxide from Games Workshop (depending on how saturated you want the finish to be, give one or two coats, always thin).


4. De segundo color como contraste a pincel Retributor Armour de Games Workshop (sombreado posteriormente con Agrax Earthshade de Games Workshop también).

4. Second color as a contrast to Games Workshop's Retributor Armor brush (later shaded with Games Workshop's Agrax Earthshade as well).

5. Las partes metálicas están pintadas con el típico color metalizado bólter, vale cualquier marca evidentemente, y después aplico un lavado de Agrax también.

5. The metal parts are painted with the typical bolter metallic color, obviously any brand is fine, and then I apply an Agrax wash as well.


6. Detalles de la cabeza en amarillo y perfilados mezclando el color predominante verde gris medio de Vallejo con blanco.

6. Details of the head in yellow and outlined by mixing Vallejo's predominant medium gray green color with white.

7. Los daños de batalla están pintados mediante la técnica de la esponja con un marrón muy oscuro (casi negro) y encima un metalizado cromado.

7. The battle damage is sponge painted with a very dark brown (almost black) and a chrome metallic on top.

8. Los efectos de las armas realizadas con aerógrafo tipo OSL (object source lighting) que es el efecto de iluminación que da de fuente un objeto por explicarlo de alguna manera. Pintas el color base (azul por ejemplo) y vas aclarando en función del efecto que quieras obtener, si me lo pedís en comentarios hago un tutorial detallado pero seguro encontraréis muchos ya.

8. The effects of weapons made with an airbrush type OSL (object source lighting) which is the lighting effect that an object gives from a source to explain it in some way. You paint the base color (blue for example) and lighten depending on the effect you want to obtain. If you ask me in the comments, I'll do a detailed tutorial but I'm sure you'll find many already.


9. Para terminar en la peana apliqué textura de vallejo, en este caros tierra oscura (código 26.218) y encima con aerógrafo para dar efecto polvo y un contraste marrón rojizo de vallejo gama model air (aprovechando que lo tengo para no tener que diluir tanto).

9. To finish on the base I applied a vallejo texture, on this caros dark earth (code 26.218) and on top with an airbrush to give a dusty effect and a reddish brown contrast from vallejo model air range (taking advantage of the fact that I have it so I don't have to dilute as much ).


10. El remate final fueron dos tipos de césped que compré en unas Freak Wars hace mucho tiempo a Pablo el Marqués y por fin tenía excusa para usarlas (aunque creo que las estrené con Magnus el Rojo).

10. The final shot were two types of grass that I bought in some Freak Wars a long time ago from Pablo the Marquis and I finally had an excuse to use them (although I think I debuted them with Magnus the Red).


Espero que os haya gustado, os sirva de ayuda y os anime a pintar. Os leo en los comentarios, un saludo.

I hope you liked it, it helps you and encourages you to paint. I read you in the comments, greetings.


viernes, 24 de junio de 2022

W40K - Tutorial marcadores de objetivo transparentes

Buenas a tod@s,

Después de una larga ausencia, espero que casual, os traigo un tutorial que creo os será de agrado.

Se trata de como fabricar nuestros propios marcadores de objetivo para el juego Warhammer 40.000 (novena edición) transparentes y personalizados al gusto.

Materiales básicos necesarios: 6 láminas de acetato transparentes (se utiliza para encuadernar), rotulador permanente, compás, regla para medir y tijeras. Después si queremos hacer filigranas necesitaremos más materiales como pinturas, plantillas, etc.
Pasos:

1. En el centro de cada lámina de acetato marcamos con el compás y el rotulador un círculo de 2cm de radio.

2. Aumentamos el radio del compás para marcar otro círculo de 9,6cm de radio (es la suma de los 2cm de radio del objetivo más el aura de 3 pulgadas alrededor de él, para indicar que se está controlando).

3. Cortamos con la tijera con cuidad, por fuera del círculo más grande dejando visible la línea que hemos marcado al hacerlo.

4. Ya estaría terminado, a partir de aquí depende de cada uno si quiere pintar, numerar o hacer cualquier adaptación.

Personalmente he realizado dos sets de marcadores, unos sencillos numerados y otros personalizados pintados con el logotipo del caos. Si los pintas prepara una plantilla y barniza después para evitar que la pintura salte y utiliza si es posible un aerógrafo para un acabado más fino.

Espero que os haya gustado el tutorial, espero vuestros comentarios y no olvidéis pasaros por Instagram a visitarnos.


Hi everyone,

After a long absence, I hope it's casual, I bring you a tutorial that I think you will like.

It is about how to make our own objective markers for the game Warhammer 40,000 transparent and personalized to taste.

Basic materials needed: 6 transparent acetate sheets (used for binding), permanent marker, compass, ruler and scissors. Later, if we want to make watermarks, we will need more materials such as paints, templates, etc.

Steps:

1. In the center of each acetate sheet, mark a circle with a radius of 2cm with a compass and a marker.

2. We increased the radius of the compass to mark another circle with a radius of 9.6cm (this is the sum of the 2cm radius of the target plus the 3-inch aura around it, to indicate that it is being controlled).

3. Cut with scissors carefully, outside the largest circle, leaving visible the line that we have marked when doing so.

4. It would already be finished, from here it is up to each one if they want to paint, number or make any adaptation.

I have personally made two sets of bookmarks, some numbered simple ones and others personalized painted with the chaos logo. If you paint them, prepare a template and varnish afterwards to prevent the paint from skipping and use an airbrush if possible for a finer finish.

I hope you liked the tutorial, I await your comments and do not forget to stop by Instagram to visit us.


sábado, 14 de julio de 2018

Tutorial - Imantar peanas


Buenas a tod@s,

Un compañero de la asociación me ha pedido que le enseñe el método que utilizo para imantar las peanas de mis miniaturas, así que he aprobechado el canal de YouTube para hacer un video tutorial.

Espero que os sirva de ayuda y si tenéis cualquier duda preguntarla. Un saludo.

jueves, 23 de febrero de 2017

Tips on painting leather. Algunas ideas sobre el pintado de cuero

Hello everybody, this time I would like to share my experience painting leather or actually trying to imitate leather effect on a Dark Eldar Wrack.

Spanish: Hola a todos, esta vez me gustaría compartir mi experiencia pintando cuero o, en relaidad, intentando imitar el efecto de cuero en un Wrack de los Eldar oscuros.

Over a black primer base I sprayed white with the airbrush mainly on top of the miniature and on a slight angle to do a preshading so the next step of highlighting will be easier.
After that I applied a base coat of armour brawn with the airbrush and highlighted the most prominent parts with fire orange. This is a quite clear paint so it doesn´t cover too much, actually it looks more like a thick glace than like a regular opaque paint.
These two steps are not mandatory but they help with the overall highlighting work.

Spanish: Sobre una imprimación negra, con el aero hice un preshading con blanco, principalmente desde arriba de la miniatura y con un pequeño ángulo, de modo que fuese más fácil iluminar más adelante.
Después apliqué una capa base de marrón armadura a toda la superficie e iluminé con naranja fuego las partes más prominentes usando el aerógrafo. Esta pintura es bastante transparente y no cubre mucho, realmente parece más una veladura densa que un color opaco.
Estos dos pasos no son obligatorios pero ayudan con el trabajo general de iluminación.

Once I finished with the airbrush I started working with the brushes to imitate the leather texture on the surface of the miniature.
You can start either with the shades or with the highlights.
Mix the medium tone, in this case armour brawn with a little bit of black to create the first shade and add a little bit more of black to prepare the darkest shade.
Paint the shades on the deepest parts of the miniature, specially under the wrinkles and, instead of painting them in the usual way, do it by stippling the point of the brush on the part to be painted.(YES, YOU ARE GOING TO SPOIL THE BRUSH SO USE AN OLD ONE)

Do the same with the second shade but on even deeper parts.


Spanish version: Una vez terminado el trabajo con aerógrafo empecé a trabajar con los pinceles para imitar la textura del cuero en la superficie de la miniatura.
Puedes empezar tanto con las sombras como con las iluminaciones.
Mezcla un poco del tono medio, en este caso marrón armadura con un poco de negro para crear la primera sombra y añade un poco más de negro para crear la  sombra más oscura.

Pinta las sombras en las zonas más profundas de la miniatura, especialmente bajo las arrugas y, en lugar de pintarlas de la forma habitual, hazlo dando picotazos con la punta del pincel en la parte que debe pintarse. (SÍ, VAS A ARRUINAR EL PINCEL ASÍ QUE UTILIZA UNO VIEJO)


For the highlights use the same technique but put the paint on the parts that are supposed to receive more light.
The colors I used are fire orange, yellow ochre and off white.
The first one I used was fire orange. As I said at the beginning it works almost like a glaze so it helps blending the shades with the medium tone. This color will be used later on to help blending all the colors together.
After that I added a little bit of blaze orange to yellow ochre. The contrast with the medium tone is quite notable here but as you are going to work with the stippling technique, don´t worry.
I added a little bit of off white to the previous mix to create the final highlight and painted it in the same way as the previous one.

Spanish version: Para las iluminaciones utilicé la misma técnica pero puse la pintura en las partes que se supone reciben más luz.
Los colores que utilicé fueron naranja fuego, amarillo ocre y blanco sucio.
El primero que utilicé fue el naranja fuego. Como dije al principio, actúa más como una veladura así que ayuda a fundir las sombras con el tono medio. Utilizaremos este color más adelante para ayudar a fundir todos los colores entre sí.
Después de esto añadí un poco de naranja fuego a una parte mayor de amarillo ocre. El contraste con el tono medio es bastante notable aquí pero como se va a trabajar con la técnica del punteado, no te preocupes.
Añadí un poco de blanco sucio a la mezcla anterior y pinté con este tono con la misma técnica de antes pero en superficies más pequeñas.


So far we have the basics shades and highlights. The interesting part comes now. What you have to do is to stretch the shades and the highlights, the shades towards the highlights areas and opposite. To do so, continue with the stippling technique. Obviously you don´t have to get to the areas of maximum light with the shades and with the deepest areas with the highlights.
When you have finish this part, use the fire orange to blend everything together.

Spanish version: Hasta ahora tenemos las sobras e iluminaciones básicas. La parte interesante viene  ahora. Lo que tienes que hacer es estirar las sobras y las luces, las sombras hacia las áreas de luz y las luces hacia las áreas de sombra. para hacerlo, continúa usando la técnica del punteado. Obviamente no tienes que llegar a las zonas de máxima luz ni de máxima sombra.
Cuando hayas terminado esta parte, utiliza el naranja fuego para fundir los tonos entre sí.


After that I used some inks to give some tones to the piece. I used seraphim sepia almost on most of the miniature, druchii violete on the shade areas and athonian camoshade on some shade areas.

Spanish version: Después de esto, utilicé unas tintas para darle tonos a la pieza. Seraphim sepia en casi toda la superficie, druchii violete en las zonas de sombra y anthonian camoshade on algunas zonas de sombra.

To give a final look I added some cuts and scratches. First I painted a line with the darkest shade mixed with glaze medium and just under it I highlighted it with the lightest highlight. I did this randomly but you can focus on the edges or areas that are worn out.

And this is it. I hope it is helpful for you. Thank you very much.

PS: This technique is based on the tutorial from the Miniaturism guide of the Spanish Team forum on the topic of painting leather.

Spanish version: para darle un toque final, añadí algunos cortes y arañazos en el cuero. primero pinté una línea con la sombra más oscura mezclada con glaze medium y justo debajo de la línea iluminé con la luz más clara. Lo hice aleatoreamente pero te puedes centrar en los bordes o zonas de mayor desgaste.

Y esto es todo. Espero que os haya sido de ayuda. Muchas gracias.

PD: está técnica está basada en la descripción y tutorial del manual de miniaturismo del Spanish Team sobre cómo pintar cuero.


Sorry In this pic the cuts are nor iluminated :(
Perdón pero en esta foto los cortes no están iluminados :(


jueves, 1 de diciembre de 2016

W40K - Mesa modular urbana

Buenas a tod@s,

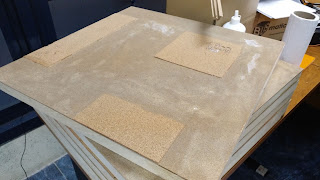
He estado trabajando en una mesa modular con diseño urbano para jugar W40K principalmente, pero que puede usarse para cualquier otro WARGAME.

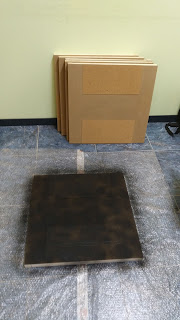
He utilizado listones de madera de 32x32mm, planchas de MDF de 600x600mm con un grosor de 5mm, clavos y cola blanca. Además de espigas para reforzar las uniones de los listones.

He montado marcos con los listones, uniendo con espigas y cola blanca los mismos. Después sobre el marco he clavado la plancha de MDF.

Para las calzadas (dónde se colocará escenografía tipo edificios) he utilizado planchas de corcho de 5mm, mientras que en el resto para simular asfalto utilicé cola blanca con arena de playa (en uno de los módulos no me quedó muy bien).

Para el pintado unos sprays de los chinos (negro y gris oscuro).

Os dejo unas fotos a ver que os parece. Saludos.


sábado, 13 de septiembre de 2014

W40K - Tapar ranura en peanas de 25mm

Buenas a tod@s,

Tengo bastantes peanas con ranuras y necesitaba taparlas para montar unos marines espaciales del caos. El caso es que tenía una masilla que compré hace tiempo en jugueterías POLY a buen precio y cumple a la perfección el cometido.

Espero que os sirva de ayuda, ya que normalmente la masilla es algo cara y según su propósito puede rentar o no. Esta masilla es de la marca TAMIYA y se llama "PUTTY", con un palillo o algo plano puedes darla sin problemas, pero no se manipula directamente con la mano.

Os dejo unas fotillos, un abrazo.


lunes, 21 de julio de 2014

W40K - Marcadores de objetivo (parte II)

Buenas a tod@s,

Marcadores de objetivo (parte I)

Tenía abandonados un poco mis marcadores de objetivos numerados para las partidas de Vórtice de Guerra y en un rato que he tenido he avanzado con ellos:


Además he montado unos para un amigo a su gusto, ya que le debo demasiados favores (no penséis mal jejeje):


Aquí unas fotillos para que podáis comprar. Personalmente, creo que me han quedado casi mejor que los míos:


Un saludo, espero terminarlos antes de que pase agosto XD.